Access to Windows Azure Management Portal https://manage.windowsazure.com/

First we have to create a VM, click on +NEW and navigate to Compute –> Virtual Machines –> From Gallery:

Select Windows Server 2012 Datacenter and click on  button:

For lab purposes we can choice Extra Small size. Fill the rest of the fields and go to next page:
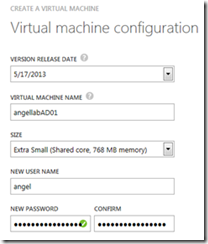
Fill the fields and ensure you are using the correct Virtual Network and Storage Account:

In the next page, click ![clip_image002[4]](https://blogger.googleusercontent.com/img/b/R29vZ2xl/AVvXsEhfUnnXL4URUq3OLLM0mTlxXAx6A3aEzOrSxLcu4LBP_u6qpMiZEZooNILI_Sx6OYzfYQzDVeT7XgpI9ItMHZASwWnmM7J3W9546KNtTiX-NK4irqRsoO12HtcWdAEYEdUbP14bNYPCBlI/?imgmax=800 "clip_image002[4]") button to start the creation of the VM.
button to start the creation of the VM.
![clip_image004[4]](https://blogger.googleusercontent.com/img/b/R29vZ2xl/AVvXsEg5cBavHL18urI8KbBTqKNwDcNM794VmVKTzZ01xx1ZU4BHAKGb_gecD3NgBWNh8wNBgzjHQShak38XUYcrnylsYdcUXHYHIhgz2o90lfDUKmx9UP6dqdAiAYzH5aKmc9an7QQD-mRpu5c/?imgmax=800 "clip_image004[4]")
As the new virtual machine is being provisioned, you will see the Status column on the Virtual Machines page of the Windows Azure Management Portal cycle through several values including Stopped, Stopped (Provisioning), and Running (Provisioning). When provisioning for this new Virtual Machine is completed, the Status column will display a value of Running and you may continue with the next step in this guide.

If we click on the VM name, the VM Dashboard will be opened:
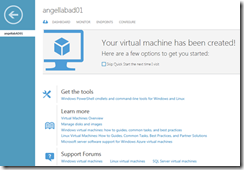
On Dashboard menu we will see all VM related information (IP, External IP, DNS, Server Name, etc.). In our case, IP address should be 10.0.0.4:
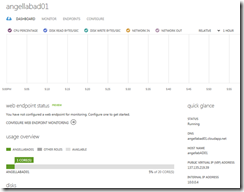
On the bottom toolbar, click on ATTACH, and select Attach empty disk:

Give a name and a size to the disk and click OK:
![clip_image004[6]](https://blogger.googleusercontent.com/img/b/R29vZ2xl/AVvXsEikO06QEAbv4wyBI5o7zK4BBsvtGjJvB4pIP3wlQr-3SrbuiJQgSknYxhkgOps9iR_lEjSPFny4fynRgRG-GFsQkzDv3cdcnIqQyptIVhsxDyH76G7fX0aY4YYFfRC6duZpuCSvWW4xZyIA/?imgmax=800 "clip_image004[6]")
On the dashboard we can see the new data disk attached:
![clip_image002[4]](https://blogger.googleusercontent.com/img/b/R29vZ2xl/AVvXsEikxt0jQ8ssBNiJDyBbcHUI3HLMKTem1MDUYqryNx4Wbpd3TICT7blDQxWvQevqCsiWP-9JEql6Al-ROHXyWz4L-2hIVJX5YYa1AGhQIDeiuffQBWTAImTc6ht_i8Z0Xs0wmDX10drjT3g/?imgmax=800 "clip_image002[4]")
Click on Connect button in the bottom toolbar:
![clip_image004[8]](https://blogger.googleusercontent.com/img/b/R29vZ2xl/AVvXsEgrIAZteyhArsteS_a40Jxsa5lgVY-YRYQ82-I2-_gHEtqbcvXJ0XfhkIAdFjT2bSs26o2A-kKqDIH7ulQTYw0yrECNLabW9bIbhC4c_0qqoHXo5Cq-FEj2uuutSzn5nFk08z1zrPL_CRY/?imgmax=800 "clip_image004[8]")
If you receive this message, click on Open:
![clip_image006[4]](https://blogger.googleusercontent.com/img/b/R29vZ2xl/AVvXsEh-uwSX-fKb3mGb3rHvCTvXwva3e4QUeubh9G1y5qWuq-ccoHUKFEVSn9TGuycdaL442YN6bILi1N34zJ4DNqtY5itnWkYBpfyP-i8aSI8mwvRV7xbFFv-4t7uH0bw4g5oF26FG3pFp_Vo/?imgmax=800 "clip_image006[4]")
Or Save if you prefer to save the .rdp file in your machine and use it in the future.
In the next window click Connect button:
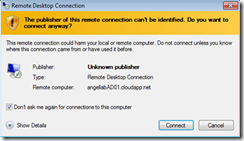
Enter your credentials and click OK. You will access to your new AD server.
![clip_image002[6]](https://blogger.googleusercontent.com/img/b/R29vZ2xl/AVvXsEh31mkw-Y0vFc6M25xVMPeUUYXS_s1-h01AUDtMwMD2WwsUHNMfTMtl1QNOQkdUxZvGGHxxrr4zyw9F-_4fWVPSQ9TFV0Wt07dAIOEkgipYLQ9Whm3r-EQgQCLi4GpXeBII-NZgW1YoKj0/?imgmax=800 "clip_image002[6]")
You will access to your new AD server:
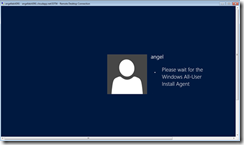
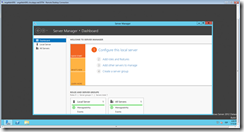
Inside the AD server, go to Server Manager –> File and Storage Services –> Volumes –> Disks
Right click the 10GB disk we have created right now and select New Volume:
![clip_image002[8]](https://blogger.googleusercontent.com/img/b/R29vZ2xl/AVvXsEgAjZl6D1VqtHOgAC9rOH7u6zMDm9q-G9Q-lB6YpNki-9lSBHf2rFy66pzyJQCR9y6s6bS3GYoy5_gud0GnpYy5azsJXsPRotK0YvBv5gY4MQ-hb8kKE7IRgli2Rws2kVegQRUYmBe2MEw/?imgmax=800 "clip_image002[8]")
And Next:
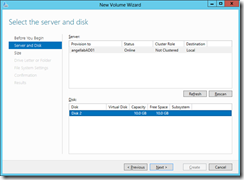
To use all the available space, click Next:
![clip_image002[10]](https://blogger.googleusercontent.com/img/b/R29vZ2xl/AVvXsEgO_waL3a7zvUYk1Cq4DURX_HPV88Wti7HkerfpFp-aqDDWBbcY4zoHfRqE800P26vEgEA2RNWfrT6Bw3qfzGGze0i7EZ5LI4hd80cfpUUcxpbM5bBj_vCbHxYGYiOKA2DQo0AIB6lHRfM/?imgmax=800 "clip_image002[10]")
Click Next:

And Next again:
![clip_image002[12]](https://blogger.googleusercontent.com/img/b/R29vZ2xl/AVvXsEgniFqnvCSRX6jKtDYFtMWS7ie_eBVLJH-3fjbL9WFEQmO60qgHr4MLyvjZHI0blaSefZbnbt2-GUUnVoSfUnghkAKJ2jGZ_HRdsN5f1C_89eWU-DuqUs_n6ilk74Y4G69ubo8gFK0L4bkG/?imgmax=800 "clip_image002[12]")
And click on Create:
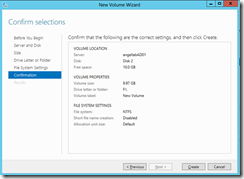
When process is finished click on Close button:
![clip_image002[14]](https://blogger.googleusercontent.com/img/b/R29vZ2xl/AVvXsEiSEwZBMR5GQGMmLanifsJk_9asGQ8oBS_wrYcA5msH_DezuC2tFA_zAMHyKXp0pXrVemG9P4_vIN-hwpx-gMKvTxL900enH24I6Can2w4EKor9vuMEkpKyPW11stkAeR8-D06xv7k7vYU/?imgmax=800 "clip_image002[14]")
From Server Manager Dashboard click on Add roles and features:

Click Next. Select Role-based or feature-based installation and click Next:
![clip_image002[16]](https://blogger.googleusercontent.com/img/b/R29vZ2xl/AVvXsEgS5h9pyzDXkFNzdyz08CwsQhU_NbWhn5kGnVmMa36cT4EIDdjb44apTsuDA0kiQXmDrTV3Xygr2R_oKkmP6x2viIbtkGC60dOZd_PjD8avlxO7ewCMCpciaGxxEgzcHAskYMWE3Ky3coA/?imgmax=800 "clip_image002[16]")
Click Next. Select Active Directory Domain Services:
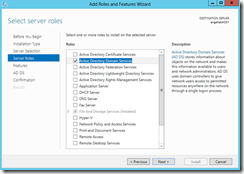
Click on Add Features:
![clip_image002[18]](https://blogger.googleusercontent.com/img/b/R29vZ2xl/AVvXsEhVBbQ5JbSlXqe5Vn-xwLbkfEhYv8UIutiHMNpy8hBVTn45thlq8pEYA4zEka5WuxCsscDI1YTYULNqLxcpmIMLcmWR_Lw5Ml3c7YcPpXM89soAS1H8qhuouOo4ACtaKYsdkQu8J1VM0gDg/?imgmax=800 "clip_image002[18]")
And click Next.
In the next windows, click Next, Next and Install.
Go to AD DS menu in Server Manager:
![clip_image002[20]](https://blogger.googleusercontent.com/img/b/R29vZ2xl/AVvXsEjl-oI7dCR_6LF2nwl_QVxZKHn26Vjhx37xdUexXi0CE9K756QB-4IrCYf4UJ_ng6PHXUnzuUKIoUb296yr9Kfq6c_8z3ZDQ6sLCBrbWm7Vyu0NKCGfUzjK-maMWSqHgR4L0GyGAYkPuNJd/?imgmax=800 "clip_image002[20]")
Click on More… (system advise to us that we have to follow a post-deployment configuration for AD):
![clip_image002[22]](https://blogger.googleusercontent.com/img/b/R29vZ2xl/AVvXsEi4GWZk8VjNyg9wuyWXJMQ97QXJgkgGffA1cQtb7qWt3tPb6o-DcehpatKaU8KElpny4-osP8RXZEHOCkIixLp8vUctfnKwdF4YXNurW5miUCSOccMQkD-hZbHqM3BV0jZvTsRw1lNgQFMR/?imgmax=800 "clip_image002[22]")
Click on Promote this server to a domain… link to start the configuration.
Create a new forest with the name you prefer, and click Next:
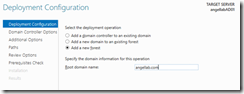
Type a password and click Next:

Click Next in the following window. And Next again.
Put all the paths in the drive we have attached, F:
![clip_image002[24]](https://blogger.googleusercontent.com/img/b/R29vZ2xl/AVvXsEhacGwBg3uvU2kEIPW5ZmkebC3DcEXbQVAVrneRg539TNchyphenhyphen_nNR0RGgOAvCr-xpK7x7fpSI0CejPkV8HvYfDT32ucg6R2j9V7KnqWRqUjI3OsgPpeWbzLxTDfbFol1LrJo1tVnU4u9E00/?imgmax=800 "clip_image002[24]")
Next, Next and Install.
Now you can create domain users that you could use in the rest of server you will create, and join them to your domain.


![clip_image001[4]](https://blogger.googleusercontent.com/img/b/R29vZ2xl/AVvXsEhAZa8LeOloxc9r1UePvS1nMsHdXifsEwJKq7Oc6eq7YHtnipHFMC_OHKRuTJtcyjkf4Ql3YGBQ_LQVXYXgCeWZr2G5vtazSjASonMTFnMh0UcOOnXNOvYIqaxRbWvAIr9qXc7YenEosfU/s1600-h/clip_image001%25255B4%25255D%25255B2%25255D.png "clip_image001[4]")


![clip_image002[4]](https://blogger.googleusercontent.com/img/b/R29vZ2xl/AVvXsEhlphnC7JeHzV0QBLvthlHpKd0QHoWBEYfqhNqxHJampyxXVJP46O-U1JDaXMvkXWZYPIv0oY5-_8Pq4qCi9HDaJH4GYOtsmTPswVaMkBA0ag1kWBmnZwxCHeyQXr5W9cdC0N1yRP8SB8Qd/s1600-h/clip_image002%25255B4%25255D%25255B2%25255D.jpg "clip_image002[4]")


![clip_image002[4]](https://blogger.googleusercontent.com/img/b/R29vZ2xl/AVvXsEieSQSQIOxYDDZdJMaZBwvOnrsjCUCFlG_iUjPesuUz8hCp7JnyF5lPnopWHPbjnRRUdQsdVlafqFRwyllWxTAZ8KGwwjfZ8RdMBefpMir1_1YkOo3VNWtsxHrnNu6AdjXIS70o6TuL0xE/s1600-h/clip_image002%25255B4%25255D%25255B2%25255D.jpg "clip_image002[4]")
![clip_image002[6]](https://blogger.googleusercontent.com/img/b/R29vZ2xl/AVvXsEhjrm0B901Qs_ewGs692pV6EAYhevvrq22whlUdFL1tnBpPTSGgdsgp_9Iy9yGpqEeA4jw86SZyT773bw81Sq29NcZcZ5HvHi8k_DOIzPew6ybhNCzlfD0_UKtWEC_4BvJYGpuQycOTRaA/s1600-h/clip_image002%25255B6%25255D%25255B2%25255D.jpg "clip_image002[6]")


![clip_image002[8]](https://blogger.googleusercontent.com/img/b/R29vZ2xl/AVvXsEhFHsz_pT3rVzKId9lKt09u0FO5K95s2NRss8vweIhnT5l_xe_Uf-Mi4e_SUYBQ7BLtafPA5jwE94iT3HVPvfoEExthJEc4AUoBaEqEkoTNbccnRLZX3NMP5ipVVA8VnDZO_lP_BsHlNJHP/s1600-h/clip_image002%25255B8%25255D%25255B2%25255D.jpg "clip_image002[8]")

![clip_image002[10]](https://blogger.googleusercontent.com/img/b/R29vZ2xl/AVvXsEhI8AsJh3bmZm7VJ-1XisRyfs-wcznBfunZeF1o4hFU2Yy89WI0aVVxY4kpQm2cAPaXzSDXTRTPURI-vP_UXIFxJqIEMV-xNyyjYAIU45svMVtJua47iEysx2C4iOqtWrtL1171p0oM_sA/s1600-h/clip_image002%25255B10%25255D%25255B2%25255D.jpg "clip_image002[10]")
![clip_image004[4]](https://blogger.googleusercontent.com/img/b/R29vZ2xl/AVvXsEhW_BDFvUH2jbzcvfszq19diR8IUuKKLRxDTNz9TxpazLO3VcbA9cm-gefnCS8d9EzNKaKn-QPP3GLUzO5rA0YXsCiZr_02BUJ0lgxJBcJq84wkzQz8aQGCOApFyur0y_QKLVbEcs1R_SA/s1600-h/clip_image004%25255B4%25255D%25255B2%25255D.jpg "clip_image004[4]")

![clip_image002[12]](https://blogger.googleusercontent.com/img/b/R29vZ2xl/AVvXsEjKq8dsKD0SA_vD5WcpXas0Z5aaN_nhvrKGS2RSi5oOym5VvdL8stb2xUYxnBPu6u8s8B7GG0Og0Vt55arqjMRBbVqbB4Dkmty5qSX0bOEzqetMRsPT15hyphenhyphenUnTFNaGHfthAnLm6cGRfDTQ/s1600-h/clip_image002%25255B12%25255D%25255B2%25255D.jpg "clip_image002[12]")
![clip_image004[6]](https://blogger.googleusercontent.com/img/b/R29vZ2xl/AVvXsEjRTNvFNdrKPqIz1wBq_QpLLs8dYI47SXqDzFMCnsiknTrMFN85gbIpLTto5rKqEP__J_YTCXirYAsxIVJYf86xSI3vKW7QGCzS93jCuhMO14ES6ywqIozYb7B6wmFORVSOcnFj65BgSbI/s1600-h/clip_image004%25255B6%25255D%25255B2%25255D.jpg "clip_image004[6]")

![clip_image002[14]](https://blogger.googleusercontent.com/img/b/R29vZ2xl/AVvXsEiHKiUnQDC7Y8D4sDECkT3lJBaroqKPdSe7fdK1A9I0GfMjnx7AaNfmBBhUcMUq20qhOsBa-YGkODjNgI4eWAMAkwMC4eEqYW-gEtduzj96fLJH7LgX5HazrLlYqd4TEWyxcCmvexRJAVny/s1600-h/clip_image002%25255B14%25255D%25255B2%25255D.jpg "clip_image002[14]")


![clip_image002[4]](https://blogger.googleusercontent.com/img/b/R29vZ2xl/AVvXsEiOo1NL8mr_rZKcCsWsLtCNThRXmo3umQ-ikNofUHlwdAVN-My7xyGxVdBjDRQ5XVPqRk1h0PtA6fpXHoNeUiVeb8lHxMg13nJXFAdpYhYL5ssI_j0HqJIauubttwnXMOppGut8foVdwbdg/s1600-h/clip_image002%25255B4%25255D%25255B2%25255D.png "clip_image002[4]")
![clip_image004[4]](https://blogger.googleusercontent.com/img/b/R29vZ2xl/AVvXsEh2qW_tbM9D2KkH7gQ2caO5zvytaJSQQ67cYRi_c643SB_RPaXhELngjvu_Wha6Ew67Ldw3RYgJ3HtxP5lXgpk3DMRfrfbFwI7PE06JN8QP2yUDoSNAAAJl7tEWD8L44Utpthbj3ARnAtg/s1600-h/clip_image004%25255B4%25255D%25255B2%25255D.jpg "clip_image004[4]")


![clip_image004[6]](https://blogger.googleusercontent.com/img/b/R29vZ2xl/AVvXsEiAG3J250XpD2eKFA6tfKzkB0ksKnNwJMmaFsX2HTPyx73hq8oNjEGKYEhAX7OCNzFlIQJ3vMYTOo-nuMB5svSj_w4zrjcHqI713tffaTzS77sisdiwY9XzRugf4ESMUgJij14uo1O3SvYU/s1600-h/clip_image004%25255B6%25255D%25255B2%25255D.jpg "clip_image004[6]")
![clip_image002[4]](https://blogger.googleusercontent.com/img/b/R29vZ2xl/AVvXsEjndH6d3RkQOdL5lsTVwjne6qAdN74Bhyphenhyphen2f5jkVp6X6M06B-tePVOEvDlcRw9QAtyN9OzHWTKYzgKr3HB0zZ3MGuGxCs3_ZvxBUouydJw7eely-z0b7Ro3jkMa51m3e7RRzgcnDvY0lqjA/s1600-h/clip_image002%25255B4%25255D%25255B2%25255D.jpg "clip_image002[4]")
![clip_image004[8]](https://blogger.googleusercontent.com/img/b/R29vZ2xl/AVvXsEjD2XcxzURedGAVcTc5kjBPqi35iNN8OhyDup_KJWC8cB2a3z7QHUELPjAK-wtV2LYeOEVJ4RLeoA3tN9dGIgK4lJHQNrosixcbcfH-n_KVZWdJ_WLE_PS1GECSde-iBCOxm7IJxgfmHRlC/s1600-h/clip_image004%25255B8%25255D%25255B2%25255D.jpg "clip_image004[8]")
![clip_image006[4]](https://blogger.googleusercontent.com/img/b/R29vZ2xl/AVvXsEiI2Y55ojQXyeztO5ChFePZVZ5DOB0QgeH3eus9hoUBR-uXMxGIhM5SW4gAgT9n1qfKSx6CGvKTyi0vfryb6Z3dAeB-C9tYVrvcOK9F4-XpkKzCwnxlvx7Z5MpLJHmQmmwIKlcT4n2SJY0/s1600-h/clip_image006%25255B4%25255D%25255B2%25255D.jpg "clip_image006[4]")

![clip_image002[6]](https://blogger.googleusercontent.com/img/b/R29vZ2xl/AVvXsEiY8b2sNwy5-_uGN7VapVnjbX1s9FTsZOb7cvJL8lMjrTwNKAntn6d5kyPS6H6GCeK6EBnqeRQxqudzoAzLkeR37Sjy8EXydFV9OAIF3s5TSUahmxcHFecfYyrsUk47BnUhTVOmqM8Zr94/s1600-h/clip_image002%25255B6%25255D%25255B2%25255D.jpg "clip_image002[6]")


![clip_image002[8]](https://blogger.googleusercontent.com/img/b/R29vZ2xl/AVvXsEiYhz5xqT5xhZwy_KWhaJmR_PVDKZPLCMF5o3nnZfCzvtJLfPeSJtc8vxsgOm44d1BBZs5WeOPwHsYNT4TgAqKamMv9AsviAclS8FQFopjhr-uayiPviEzCbzBuprgXZGNhgHp5U8oKURU/s1600-h/clip_image002%25255B8%25255D%25255B2%25255D.jpg "clip_image002[8]")

![clip_image002[10]](https://blogger.googleusercontent.com/img/b/R29vZ2xl/AVvXsEjdo3kSciJqhoA15ELaDup1GOk8e2uPaJQo8lJ2EBl9rkohuvTBUJkhN7J7QpxjcmaJjaU155q7DgVRNnJan1LvaNr0zBsBkX6xIqKT4nvwOxaMaU1bhoKn5MObnhch-NB3RR8fQVbsG8M/s1600-h/clip_image002%25255B10%25255D%25255B2%25255D.jpg "clip_image002[10]")

![clip_image002[12]](https://blogger.googleusercontent.com/img/b/R29vZ2xl/AVvXsEi7tKZY5obfGsCQs8LQWbsW8u-m_umnaHIuufwiuMr5T4PuINfUAvSOMUNm5NyjYRPGW34YTmwH17gtgXNMVIK8Y_HYs14HbDilxPYx4-CNpkiocSf1NNQfeXvZRgNavvq4K-OqBTWkOtE/s1600-h/clip_image002%25255B12%25255D%25255B2%25255D.jpg "clip_image002[12]")

![clip_image002[14]](https://blogger.googleusercontent.com/img/b/R29vZ2xl/AVvXsEidNBrrXXoJnvpda8gp7B2-ig_RR20u50kRegSX9QXUPgc7dbQm8Ua_mdiqWIZwDV4vDsmmIjZsvVNG5yfJZXY5Q2ZBsvKZZnd6yEKBjvOxX6ptycOLZFp3TTEiLMwl_61tpZ0V8sqTFxA/s1600-h/clip_image002%25255B14%25255D%25255B2%25255D.jpg "clip_image002[14]")

![clip_image002[16]](https://blogger.googleusercontent.com/img/b/R29vZ2xl/AVvXsEixtacbkHB8H4Ayr1SMBdKCjLsmMMTbvKoq74RQJJdfYrgVdEnQTESk9uo0fZeeXbjMdpRNx06sH19T4U0WMvDgGqZ0t50gIMyH4EXGKPCaZBcyQh0Qgf-LLHRsyQAZyR63x8wXdWx1Qc8/s1600-h/clip_image002%25255B16%25255D%25255B2%25255D.jpg "clip_image002[16]")

![clip_image002[18]](https://blogger.googleusercontent.com/img/b/R29vZ2xl/AVvXsEjf_9jwhhmFAbCRjyTx6l3mokJV-D4ZoCn0DRs7WpZ8lCbOtekHn2t5gpsebuk9H0dAre3wDOLWl_I2nia585WpiQwv3kNq_LwdA5TPmoKEPicDCFKk5ajArl0jvS-V-F7HiYSYEZIzzRcW/s1600-h/clip_image002%25255B18%25255D%25255B2%25255D.jpg "clip_image002[18]")
![clip_image002[20]](https://blogger.googleusercontent.com/img/b/R29vZ2xl/AVvXsEhMBIu52vTlIhDauCN_x9I4R2i9fXuTRm1m50bxdkRH6deMHAnoV3XuWf77BaxtU9Z_2VM0_l0HmUdpSWoiMX0pwJjNPHUcRSbFykASBq8uawYdQzvhuL8zNs4Ydf9oXGERg93k8IMcEvY/s1600-h/clip_image002%25255B20%25255D%25255B2%25255D.jpg "clip_image002[20]")
![clip_image002[22]](https://blogger.googleusercontent.com/img/b/R29vZ2xl/AVvXsEgstQ5EPCD46GqT4N2HeIusqerSMg4TZYj1f1QP7DHTnnrrnA6ozPHIJqAKOjKqgyVRHY8wDlSq1gmaQ9Gfmolow8pU0HbQcCT0hVoO0eA7fDJrU_oBtChHd6WQNK_-_yOGXYiVzSvvk-Pe/s1600-h/clip_image002%25255B22%25255D%25255B2%25255D.jpg "clip_image002[22]")


![clip_image002[24]](https://blogger.googleusercontent.com/img/b/R29vZ2xl/AVvXsEh1PorQ3uxCHdoVi_Qm-ZCz344HVvwUQsZkRJbINz3KD_y487lN9G5z-3jBOqNvcd7f5UL52pXH1pTC5er2GzkvuffLjm9OYJ_NQnrP6lCmgq_G6SoVAfDdIWuXabOoW3DojL9ZwRSWBB4/s1600-h/clip_image002%25255B24%25255D%25255B2%25255D.jpg "clip_image002[24]")


